애플리케이션에서 메인 스레드를 멈추지 않고 뭔가 다른 일을 하고 싶다면 보통은 스레드를 만들어서 사용할 수밖에 없다. 그런데, 스레드를 만들어서 사용하려고 하다 보면 스레드 간 데이터 전달이나 스레드를 멈추는 방법, 스레드가 종료되었을 때 알아내는 방법이 의외로 복잡해서 쉽게 접근하기가 어려운 면이 있다. 그런데, 그런 스레드를 쉽게 사용할 수 있게 도와주는 클래스가 있는데, 그 이름은 바로 BackgroundWork이다.
BackgroundWork 클래스를 사용할 때 스레드에서 호출할 함수만 지정하면 간단하게 사용이 가능하고,
작업의 진척도를 알아 내거나, 완료되는 시점도 알 수 있고, 작업 도중 취소도 가능하다.
다음은 WPF 예제 프로그램을 실행했을 때의 모습이다.

Start를 누르면 가상의 백그라운드 작업을 시작하고, 진행률은 상단 프로그레스 바와 우측의 TextBlock으로 알려준다.
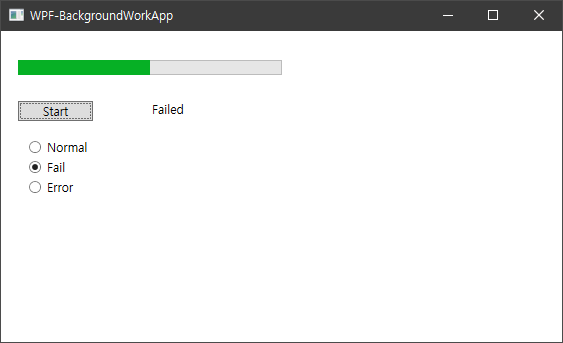
작업이 중단되거나 종료되면 그 결과 또한 우측의 TextBlock에 메시지로 표시해 주는 간단한 예제이다.
Start 버튼 아래에 있는 라디오버튼은 테스트를 위한 실행 옵션인데, Normal을 선택하면 정상적으로 종료가 되고, Fail은 스레드 작업 도중 문제가 생겨 강제로 중단한 경우를 가정한 것이고, 마지막 Error는 예외(Exception)가 발생해서 스레드가 예상치 못하게 종료된 경우를 가정한 것이다.

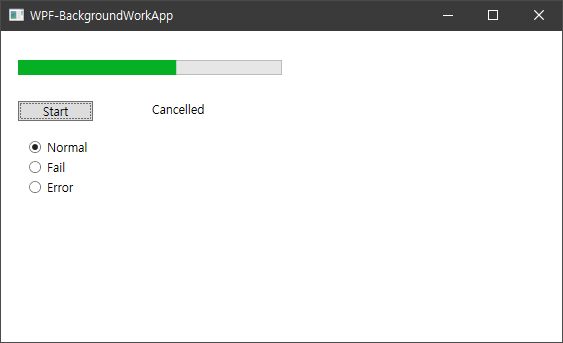

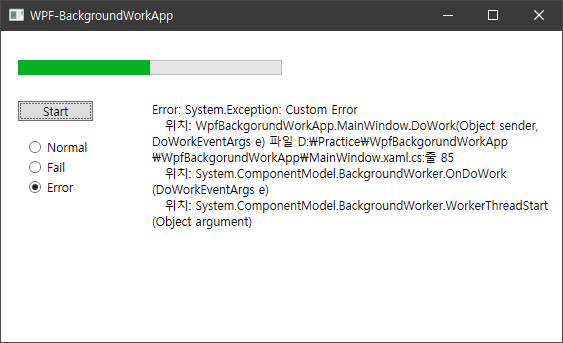
주의) 비주얼 스튜디오에서 디버그 모드 상태에서 Error 옵션으로 실행하면, 비주얼 스튜디오가 예외를 먼저 잡아서 일시 중단되지만, 계속 진행을 하면 위의 스샷과 같은 결과를 볼 수 있다. 릴리즈 모드에서는 바로 저렇게 표시된다.
다음은 위의 예제의 WPF UI 코드이다.
<Window x:Class="WpfBackgroundWorkApp.MainWindow"
        xmlns="http://schemas.microsoft.com/winfx/2006/xaml/presentation"
        xmlns:x="http://schemas.microsoft.com/winfx/2006/xaml"
        xmlns:d="http://schemas.microsoft.com/expression/blend/2008"
        xmlns:mc="http://schemas.openxmlformats.org/markup-compatibility/2006"
        xmlns:local="clr-namespace:WpfBackgroundWorkApp"
        mc:Ignorable="d"
        Title="WPF-BackgroundWorkApp" Height="350" Width="577">
    <Grid>
        <Button x:Name="button" Content="Start" HorizontalAlignment="Left" Margin="17,70,0,0" VerticalAlignment="Top" Width="75" Click="buttonStart_Click"/>
        <ProgressBar x:Name="progressBar" HorizontalAlignment="Left" Height="15" Margin="17,29,0,0" VerticalAlignment="Top" Width="264"/>
        <TextBlock x:Name="textBlock" HorizontalAlignment="Left" Margin="151,70,0,0" TextWrapping="Wrap" Text="Press Start" VerticalAlignment="Top" Width="408" Height="239"/>
        <RadioButton x:Name="radioButtonSuccess" GroupName="option" Content="Normal" IsChecked="True" HorizontalAlignment="Left" Margin="27,109,0,0" VerticalAlignment="Top" Checked="radioButtonSuccess_Checked"/>
        <RadioButton x:Name="radioButtonFail" GroupName="option" Content="Fail" HorizontalAlignment="Left" Margin="27,129,0,0" VerticalAlignment="Top" Checked="radioButtonFail_Checked"/>
        <RadioButton x:Name="radioButtonError" GroupName="option" Content="Error" HorizontalAlignment="Left" Margin="27,149,0,0" VerticalAlignment="Top" Checked="radioButtonError_Checked"/>
    </Grid>
</Window>
아래는 c# 소스코드이다.
using System;
using System.ComponentModel;
using System.Windows;

namespace WpfBackgroundWorkApp
{
	/// <summary>
	/// Interaction logic for MainWindow.xaml
	/// </summary>
	public partial class MainWindow : Window
	{
		enum RunOption { Normal, Fail, Error }

		RunOption _runOption = RunOption.Normal;

		BackgroundWorker _worker;

		public MainWindow()
		{
			InitializeComponent();

			UpdateControls();
		}

		private void UpdateControls()
		{
			if (_worker == null)
				button.Content = "Start";
			else
				button.Content = "Cancel";
		}

		private void buttonStart_Click(object sender, RoutedEventArgs e)
		{
			// 백그라운드 작업이 이미 있는 지 확인
			if (_worker == null)
			{
				progressBar.Value = 0;

				_worker = new BackgroundWorker();
				_worker.WorkerReportsProgress = true;
				_worker.WorkerSupportsCancellation = true;

				_worker.DoWork += DoWork;
				_worker.ProgressChanged += ProgressChanged;
				_worker.RunWorkerCompleted += RunWorkerCompleted;

				// 작업 시작
				_worker.RunWorkerAsync();
			}
			else
			{
				// 작업 취소
				_worker.CancelAsync();
			}

			UpdateControls();
		}

		// 백그라운드 스레드 작업
		public void DoWork(object sender, DoWorkEventArgs e)
		{
			BackgroundWorker worker = sender as BackgroundWorker;

			int count = 10;
			for (int i = 0; i < count; ++i)
			{
				// 작업이 취소 되었을 경우
				if ((worker.CancellationPending == true))
				{
					e.Cancel = true;
					break;
				}

				// 작업이 실패 했을 때
				if (_runOption == RunOption.Fail && (i == count / 2))
				{
					e.Result = "Failed";
					return;
				}

				// 작업 중 예기치 않은 오류가 발생했을 때
				if (_runOption == RunOption.Error && (i == count / 2))
				{
					throw new Exception("Custom Error");
				}

				System.Threading.Thread.Sleep(100);

				worker.ReportProgress((i + 1) * 100 / count);
			}
		}

		// 진행 상황 - UI 스레드
		public void ProgressChanged(object sender, ProgressChangedEventArgs e)
		{
			progressBar.Value = e.ProgressPercentage;
			textBlock.Text = e.ProgressPercentage + "%";
		}

		// 작업 종료 - UI 스레드
		private void RunWorkerCompleted(object sender, RunWorkerCompletedEventArgs e)
		{
			string message = "";

			if (e.Cancelled)
			{
				message = "Cancelled";
			}
			else if (e.Error != null)
			{
				message = "Error: " + e.Error.ToString();
			}
			else if (e.Result != null)
			{
				message = e.Result.ToString();
			}
			else
			{
				message = "Success";
			}

			textBlock.Text = message;

			_worker = null;

			UpdateControls();
		}

		// 실행 옵션
		private void radioButtonSuccess_Checked(object sender, RoutedEventArgs e)
		{
			_runOption = RunOption.Normal;
		}

		private void radioButtonFail_Checked(object sender, RoutedEventArgs e)
		{
			_runOption = RunOption.Fail;
		}

		private void radioButtonError_Checked(object sender, RoutedEventArgs e)
		{
			_runOption = RunOption.Error;
		}
	}
}
스레드에서의 취소 처리는 worker.CancellationPending 값을 검사해서 e.Cancel에 true를 직접 넣고 리턴해야 한다. 스레드가 강제로 종료되는 게 아니라는 점에 주의해야 한다.
이 예제에서는 RunOption.Error인 경우 임의로 예외를 만들어서 throw 하는 코드를 작성해서 넣었는데, 실제 어플을 작성할 때는 필요 없는 코드이다. 이 예제에서는 딱히 오류 날 부분이 없어서 임의로 추가한 것이다.
작업 도중 실패(fail)가 난 경우, 즉 외부에서 중단한 게 아니라 스레드 내부에서 작업 도중에 더 이상 진행이 불가능할 때도 e.Cancel에 값을 넣어서 중단해도 되지 않을까 싶지만, 해당 변수는 그런 용도로 만들어진 게 아니라서 권장하지 않는다고 한다. 정상적으로 종료하되 e.Result에 값을 넣는 게 좋다.
MSDN 예제를 보면 성공했을 때에도 e.Result에 무언가 값을 넣어서 종료 처리할 수도 있다. 하지만, 이 예제에서는 성공했을 때는 아무 값을 안 넣은 상태를 완전한 성공으로 간주했다. 이건 코드 작성자의 선택사항이다.
이 예제에서는 e.Result에 string을 넣었으나 다른 타입의 변수, 예를 들어 오류코드를 담을 수 있는 int 값이나, enum 등을 사용하는 것도 가능하다.
RunWorketCompleted 함수에서 e.Cancelled가 true인 상태에서는 e.Result 변수에 접근할 수 없다. 예외가 발생하니 주의가 필요하다.
이 예제에서는 백그라운드 작업의 진행 여부를 판단하기 위해 _worker 변수가 null 인지 아닌지를 검사하도록 했는데, 이것도 코드 작성자의 선택사항이다.
_worker 변수를 딱히 쓸 일이 없는 경우, 클래스 멤버 변수가 아니라 로컬변수로 정의해서 사용해도 사실 상관없다. 내부적으로 레퍼런스가 있기 때문에 스레드 작업이 완전히 종료될 때까지 가비지 컬렉터가 지우지 않는다.
BackgroundWorker 클래스는 나온지 오래되었기 때문에 사실 꽤 안정적이고 하위 호환성도 좋다.
이 예제의 소스코드는 WPF용으로 만들어졌지만, WinForm에서도 약간만 수정하면 그대로 사용이 가능하다.
ProgressChanged, RunWorkerCompleted 함수는 WinForm과 WPF에서는 UI 스레드이기 때문에 UI 컨트롤을 사용하는 데 지장이 없다.
하지만, 이 예제를 C# 콘솔버전에서 돌리면 Main 스레드가 아닌 다른 스레드에서 실행된다.

즉, 콘솔용으로는 적합하지 않을 수 있다. 애초에 콘솔 어플에서 백그라운드 스레드를 돌릴 이유가 없어서 고려를 안 했다는 얘기도 있다. 이건 그냥 참고로 알고 있자.
'개발 > WPF' 카테고리의 다른 글
| [WPF] 타이틀바 없는 None 스타일 윈도우에 시스템 버튼 추가하기 (0) | 2020.12.30 |
|---|---|
| [WPF] 기본 버튼의 스타일을 바꾸는 방법 (0) | 2020.12.26 |
| [WPF] 테마와 스킨 (0) | 2020.12.24 |